
Key takeaways
- Pulling hair sideways: Side pressure can bend teeth or loosen their mounting points. Pull fur upward and in the direction of the teeth.
- Using scissors to cut hair free: It is easy to nick a tooth, cut a glove, or injure your hand. Use a comb and take smaller sections instead.
- Soaking the entire tool: Water can damage wooden handles, foam grips, internal fasteners, and glued joints.
- Using bleach or strong disinfectants: These products can corrode metal and leave chemical residue. Mild soap is sufficient for routine cleaning.
- Ignoring bent teeth: A bent tooth can scrape skin or snag fur. Do not try to aggressively bend it back if it is sharply kinked or loose.
- Putting the rake away damp: Even a small amount of moisture can lead to discoloration or rust around the tooth bases.
An undercoat rake works by reaching through the topcoat to lift loose fur from the dense layer underneath. That makes it effective during shedding season, but it also means the teeth can quickly pack with hair, dander, and skin oils. If you pull the buildup off carelessly, you can bend the pins, loosen the handle, cut your fingers, or leave residue that makes the rake drag through the next coat.
The safest approach is to remove hair in small sections, clean between the teeth without forcing them apart, and dry the tool completely before storing it. This method works for single- and double-row rakes, including wide double-sided shedding and dematting styles commonly sold for about $12 to $15 in 2026.
Our top picks
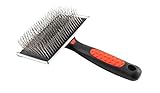
 Maxpower Planet Dog Grooming Rake
- Product Group: Pet Products
- Binding: Misc.
 Maxpower Planet Hair Brush
- Product Group: Pet Products
- Binding: Health and Beauty
As an Amazon Associate we earn from qualifying purchases at no extra cost to you. Ratings are shown as listed on Amazon.
What You Need
| Item | Why | Optional? |
|---|---|---|
| Clean, dry towel | Provides a non-slip work surface and catches loose hair. | No |
| Nitrile gloves | Protect hands from sharp rake teeth and stuck hair. | Recommended |
| Fine-tooth comb or grooming comb | Helps lift small clumps lodged between closely spaced teeth. | Recommended |
| Old toothbrush or small cleaning brush | Removes dander and fine debris from the tooth bases. | Recommended |
| Warm water and mild dish soap | Breaks down skin oils and residue on metal teeth. | Optional |
| Rubbing alcohol, 70% isopropyl | Useful for disinfecting after use on an animal with a skin issue, if your veterinarian recommends it. | Optional |
| Small bowl | Lets you clean only the metal head instead of soaking the handle. | Optional |
Step-by-Step
1. Set the rake on a stable towel (1 minute)
Place a folded towel on a counter, table, or other stable surface. Lay the rake flat with the teeth facing up. Avoid balancing it in a sink or holding it in one hand while pulling hair with the other; that is when the teeth are most likely to catch a finger.
If the rake has two working sides, identify which side needs attention first. Dematting sides often have fewer, more widely spaced teeth, while deshedding sides may have more teeth set closer together. The closer-spaced side usually holds the most compacted hair.
2. Remove the loose outer layer with your fingers (2 to 3 minutes)
Put on gloves if you have them. Grip the fur near the tips of the teeth, not at the base where it is tightly wound. Pull the hair straight up and away from the rake in the same direction the teeth point. Work from one end of the head to the other.
Do not yank a full mat of fur off in one motion. Instead, divide it into strips about 1 inch wide. Small sections release with less stress on the teeth and are less likely to pull a pin sideways. Deposit the hair directly into a trash can or bag rather than letting it drift around the room.
3. Lift trapped hair from between the teeth (3 to 5 minutes)
Use a fine-tooth comb to tease out hair caught near the base of the pins. Hold the comb nearly parallel to the rake head and draw it gently through the gaps. A grooming comb with metal teeth is especially useful for rakes with narrow spacing.
If you do not have a comb, use the handle end of a small brush or a wooden skewer with a blunt tip. Never use a knife, scissors, screwdriver, or needle. Metal tools can scratch protective coatings, and sharp points can wedge between teeth and bend them out of alignment.
For a double-sided rake, clean each side separately. Turning the tool over repeatedly while hair is still attached can push loose fur deeper into the opposite row.
4. Brush away dander and fine debris (2 minutes)
Once the visible fur is gone, scrub gently along the base of the teeth with a dry toothbrush or small cleaning brush. Use short strokes from the handle toward the tooth tips. This direction moves debris out rather than packing it into the head.
Pay attention to the spots where each tooth enters the rake head. Hair, dried saliva, flakes, and grooming-product residue often collect there. Removing this buildup helps the rake glide more smoothly through a pet’s coat the next time you use it.
5. Wash the metal head only when needed (3 to 5 minutes)
If the rake feels greasy, smells unpleasant, or has visible residue after brushing, add a few drops of mild dish soap to a bowl of warm water. Dip only the metal teeth and head into the water for about 30 seconds. Keep wood, padded foam, and non-waterproof handle sections out of the bowl.
Use the toothbrush to clean between the teeth, then rinse the metal portion under a light stream of warm water. Do not use very hot water, bleach, or a dishwasher. High heat can damage adhesives and plastic components, while harsh chemicals may corrode metal or leave residue that could irritate a pet’s skin.
6. Dry thoroughly and inspect the rake (5 to 10 minutes)
Blot the teeth with a clean towel, then leave the rake teeth-up in a dry, well-ventilated spot until all moisture has evaporated. Drying is important because moisture trapped at the tooth bases can encourage rust, especially on lower-cost steel grooming tools.
Before putting the rake away, inspect every tooth. They should sit in an even line and feel firmly attached. Look for bent teeth, rough edges, cracked plastic around the head, loose screws, or separation between the handle and rake head. A clean tool is only safe if its teeth remain smooth and stable.
7. Store it so the teeth stay protected (1 minute)
Store the rake in a drawer, grooming tote, or lidded container where the teeth will not rub against metal tools. Keep it dry and out of reach of children and pets. If your rake came with a cover, use it only after the tool is completely dry.
Mistakes to Avoid
- Pulling hair sideways: Side pressure can bend teeth or loosen their mounting points. Pull fur upward and in the direction of the teeth.
- Using scissors to cut hair free: It is easy to nick a tooth, cut a glove, or injure your hand. Use a comb and take smaller sections instead.
- Soaking the entire tool: Water can damage wooden handles, foam grips, internal fasteners, and glued joints.
- Using bleach or strong disinfectants: These products can corrode metal and leave chemical residue. Mild soap is sufficient for routine cleaning.
- Ignoring bent teeth: A bent tooth can scrape skin or snag fur. Do not try to aggressively bend it back if it is sharply kinked or loose.
- Putting the rake away damp: Even a small amount of moisture can lead to discoloration or rust around the tooth bases.
How Often
Remove hair after every grooming session, even if the rake does not look heavily loaded. This typically takes less than 2 minutes and prevents a dense plug from forming between the teeth.
Give the rake a more detailed brush-out every 3 to 5 uses. Wash the metal head when you see oily residue, dried debris, or an odor, or after using it on a pet that has rolled in dirt or had a skin-related grooming issue. During heavy shedding periods, a household with a long-haired dog or cat may need to clean the rake after each use and wash it weekly.
A quick inspection should happen every time you clean it. Regular maintenance is particularly important with extra-wide rake heads, which can collect more hair per pass and may be more easily twisted if packed fur is removed roughly.
When to Call a Pro or Replace
Call a professional groomer if the rake is repeatedly filling with tight mats rather than loose undercoat. Undercoat rakes are designed to remove shed fur and gently work through light tangles; they are not the right tool for severe matting close to the skin. A groomer can assess the coat and use safer techniques without causing painful pulling.
Replace the rake if several teeth are bent, a tooth is missing, the teeth feel sharp or rough, the head wobbles, or the handle is cracked. Also replace it if rust does not wipe away easily or if corrosion has created pitting on the metal. A basic replacement is often in the $10 to $20 range, which is far less costly than risking a pet’s skin with a damaged tool.
FAQ
Can I rinse an undercoat rake after every use?
You can, but it is not necessary for routine hair removal. A dry comb and toothbrush are usually enough. Rinse only when the teeth have oily residue or visible grime, and dry the metal completely afterward.
How do I remove hair that is wrapped tightly around the teeth?
Start at one edge of the wrapped hair and lift a small section with a fine-tooth comb. Work gradually across the rake head. If the clump will not release without force, soften residue with a brief warm, soapy-water cleaning of the metal head, then try again.
Can I use a pet undercoat rake on furniture upholstery?
It is better not to. The teeth can snag woven upholstery, pull loops from fabric, or scratch leather and wood. Use a vacuum upholstery tool, rubber hair remover, or lint brush for furniture instead.
Why does my clean undercoat rake still pull at my pet’s coat?
The rake may be used too quickly, at the wrong angle, or on a coat with mats rather than loose undercoat. Brush in the direction of hair growth using light pressure. If pulling continues, stop and switch to a gentler brush or ask a groomer for guidance.




Write Your Review
No reviews yet. Be the first to share your experience!