
Key takeaways
- Clamping to a weak surface: A thin tabletop edge or folding joint can flex and release the clamp.
- Skipping the stability check: Test the table and arm before the dog is attached and again after the dog steps onto the surface.
- Placing the loop over the throat: The strap belongs behind the jaw, with room for comfortable breathing and swallowing.
- Using the arm as a restraint for an untrained dog: Introduce the table gradually and keep one hand available to steady the pet.
- Overextending the bar: A long overhang can make a lightweight table unstable.
- Leaving grooming tools unattended: Scissors, hot clippers, and cords should remain under your control.
- Assuming all arms fit all tables: Confirm the clamp opening and table thickness before purchase. A clamp opening of 2 inches, for example, may not fit a thicker frame.
- Relying on price as a safety rating: A under-$30 arm may suit home use, but capacity and construction details matter more than cost.
Learning how to set up grooming table arm correctly makes grooming safer, steadier, and less stressful for both you and your pet. A poorly installed arm can slip, tip the table, pinch a dog, or place pressure on the neck instead of supporting the body. An arm that is too low or loosely adjusted may also let a dog jump or twist free while you are using clippers or scissors.
The process is usually simple: choose a stable table, attach the clamp to a strong edge, secure the vertical post, and adjust the loop or no-sit support so it guides your dog without choking or restricting breathing. Plan on 15 to 25 minutes for a first setup. The instructions below apply to common clamp-on grooming arms, including 35-inch adjustable models such as the SHELANDY arm and foldable grooming arms sold with no-sit holders or hammock-style supports.
What You Need
| Item | Why | Optional? |
|---|---|---|
| Clamp-on grooming arm | The vertical support and adjustable bar hold the grooming loop, hammock, or no-sit strap. | No |
| Stable grooming table | Provides a level, non-slip work surface and a rigid edge for the clamp. | No |
| Grooming loop or no-sit holder | Helps keep the dog positioned while allowing normal breathing and head movement. | No |
| Hammock or second support | Offers extra body support for some small or medium dogs during brushing or nail care. | Optional |
| Phillips screwdriver or adjustable wrench | Some arms use bolts, knobs, or hardware that needs tightening during assembly. | Usually |
| Non-slip mat | Improves footing and reduces sliding on a smooth tabletop. | Recommended |
| Clippers, brush, comb, and scissors | Keep tools within reach so you do not leave the dog unattended while attached. | Yes |
Clamp-on arms commonly cost about $25 to $45 for basic home-use models. For example, similar listed products may be priced around $30, while heavier professional equipment can cost more. Price does not establish a safe weight limit. Always use the capacity and fitting instructions supplied with your specific arm and table.
Step-by-Step
1. Inspect and identify every part (3 to 5 minutes)
Unpack the arm and lay out the clamp, upright post, horizontal bar, adjustment knobs, grooming loop, and any no-sit holder or hammock. Look for bent metal, cracked plastic, stripped threads, sharp edges, or missing washers. If the arm folds, locate its locking pin or hinge knob before attaching it to the table.
Read the product instructions for the maximum supported pet weight, recommended table thickness, and approved attachment points. If those details are missing, contact the seller or manufacturer rather than guessing. Do not use an arm with damaged hardware.
2. Choose and prepare the table (3 minutes)
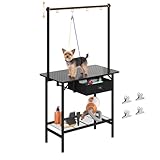
Place the table on a level floor with enough clearance on every side to work safely. Lock all table legs and wheels. A grooming table should not rock when you press down on one corner. For a small dog, a surface around 24 by 36 inches may be adequate; larger dogs need a table sized for their body and the manufacturer’s recommendations.
Clean the edge where the clamp will sit. Remove towels, hair, or loose mats that could prevent the clamp jaws from closing fully. Position a non-slip mat on the tabletop, but keep it away from the clamp’s contact surfaces.
3. Attach the clamp to a strong edge (3 to 5 minutes)
Open the clamp wide enough to fit over the table edge. Slide it onto a rigid section of the frame or tabletop, preferably near a corner or side that gives you room to groom without striking the arm. Both clamp pads should sit flat against solid surfaces. Avoid thin decorative trim, folding joints, hollow panels, or a section that flexes under hand pressure.
Hand-tighten the clamp knob until it is secure, then tighten it according to the instructions. Do not use excessive force or add a pipe for extra leverage; over-tightening can damage the table or strip the threads. Push and pull the post firmly in several directions. If it moves, reposition and retighten the clamp.
4. Install and lock the upright post (2 to 3 minutes)
Insert the vertical post into the clamp socket. If the design uses a retaining pin, bolt, or secondary knob, install it before putting any weight on the arm. The post should remain vertical rather than leaning toward or away from the dog.
Check the full height range. Many home grooming arms extend to about 35 inches, but the useful height depends on your table and the dog’s shoulder height. Set the post high enough that the horizontal bar can support the dog without pulling upward on the neck or forcing the head into an unnatural position.
5. Attach and adjust the horizontal bar (3 to 5 minutes)
Slide the horizontal arm into its receiver or hinge and engage every locking knob or pin. Keep the bar over the table rather than extending so far outside the edge that it can act as a tipping lever. On a foldable model, make sure the hinge is fully opened and locked before connecting the dog.
Adjust the bar so the grooming loop hangs near the dog’s shoulder area, not directly over the throat. Leave enough room for the dog to stand, sit, turn its head normally, and breathe easily. The support should prevent an escape attempt without suspending or lifting the dog.
6. Fit the loop, no-sit holder, or hammock (3 to 5 minutes)
Connect the loop to the bar using the supplied clip or attachment point. Place the loop high on the neck behind the jaw, never over the windpipe. You should be able to slide two fingers between the strap and the dog’s neck while the dog is standing. This is a fit check, not permission to leave the dog unattended.
If using a no-sit haunch holder, position it around the dog’s hindquarters according to the instructions. It should discourage sitting while allowing normal leg movement. A hammock should support the body evenly and should never carry more weight than its stated capacity. Use only one support at a time unless the product instructions specifically show a combined setup.
7. Test the complete setup without grooming (3 to 5 minutes)
Before using scissors or clippers, let your dog stand on the table while you hold the loop yourself. Watch the table, clamp, bar, and straps as the dog shifts position. Apply only light, controlled pressure to simulate movement. Nothing should slide, twist, or tip.
Reward calm behavior, then remove the dog and inspect every connection again. For a first session, keep grooming periods short—about 5 to 10 minutes—until your dog is comfortable. Never tie a dog to the arm and walk away, even for a moment.
Mistakes to Avoid
- Clamping to a weak surface: A thin tabletop edge or folding joint can flex and release the clamp.
- Skipping the stability check: Test the table and arm before the dog is attached and again after the dog steps onto the surface.
- Placing the loop over the throat: The strap belongs behind the jaw, with room for comfortable breathing and swallowing.
- Using the arm as a restraint for an untrained dog: Introduce the table gradually and keep one hand available to steady the pet.
- Overextending the bar: A long overhang can make a lightweight table unstable.
- Leaving grooming tools unattended: Scissors, hot clippers, and cords should remain under your control.
- Assuming all arms fit all tables: Confirm the clamp opening and table thickness before purchase. A clamp opening of 2 inches, for example, may not fit a thicker frame.
- Relying on price as a safety rating: A under-$30 arm may suit home use, but capacity and construction details matter more than cost.
How Often
Check the clamp, knobs, pins, welds, clips, and straps before every grooming session. Wipe away hair and moisture after use, particularly around threaded parts. Tighten loose knobs as needed, but do not force them.
Perform a more complete inspection monthly if you groom weekly, or every three months for occasional use. Check for frayed webbing, stretched loops, rust, bent tubing, and cracks. Replace worn straps promptly rather than sewing or knotting them in a way that changes their strength.
When to Call a Pro or Replace
Ask a professional groomer or veterinarian for help if your dog panics, lunges, collapses, coughs, or struggles to breathe while restrained. A groomer can also show you a safer position for a nervous, elderly, arthritic, or brachycephalic dog. Do not use a grooming arm to manage aggression that requires specialized handling.
Replace the arm if the clamp slips after correct installation, the post will not lock, the bar bends, a weld cracks, a hinge will not hold, or the strap is frayed. Replace the table if it rocks, has a damaged frame, or cannot support the dog and equipment safely. When the manufacturer’s weight limit or instructions are unavailable, choose equipment with clearly stated specifications instead of estimating.
FAQ
How high should a grooming table arm be?
Set it high enough for the loop or support to sit behind the dog’s jaw and around the upper body without pulling upward. A 35-inch arm may provide plenty of adjustment for many home tables, but the correct setting depends on the dog and table height. The dog’s feet should remain on the surface unless a properly rated hammock is specifically designed to support it.
Can a grooming arm fit any table?
No. The clamp must open wide enough for the table edge and must contact a rigid, stable surface. Folding card tables, glass tables, thin countertops, and tables with rounded or flexible edges may be unsafe. Confirm the clamp range and table requirements before attaching a dog.
Should a dog wear both a grooming loop and no-sit holder?
Only if the manufacturer’s instructions specifically permit that combination. The neck loop and no-sit support must not pull in opposite directions or restrict breathing and movement. When in doubt, use the primary loop correctly and keep a hand on the dog rather than adding an unapproved restraint.
How long can a dog stay attached to the grooming arm?
Only for the time needed to groom, with constant supervision. Start with 5- to 10-minute sessions and give breaks as needed. Never leave a dog attached while answering the phone, stepping away, or leaving the room.





Write Your Review
No reviews yet. Be the first to share your experience!