
Key takeaways
- Very limited floor space: Measure the complete operating envelope, not just the base. A lid needs room to open, and the user needs knee and elbow clearance. A custom DIY box can fit a narrow gap, but only if the liquid container can still be removed.
- Two people using the toilet daily: Prioritize liquid capacity and easy bottle access. A roughly 2-gallon bottle may need emptying daily or more often in warm weather. A larger bottle can reduce trips, but adds height and weight and must be secured for driving.
- Frequent off-grid stays: A fan-powered separating toilet uses little electricity compared with heating-based waste treatment. Check the fan’s actual draw and whether it can run continuously from your house battery.
- Minimal handling of liquid waste: An incinerating system avoids a urine bottle, but requires the specified fuel, power, exhaust installation, and time for cycles. It is not automatically simpler in a small van.
- Lowest upfront cost: A DIY urine-diverting build is usually the least expensive. Budget for a well-fitting diverter, sealed containers, a vent fan, hose, and a stable enclosure—not just a bucket and seat.
Best Composting Toilets for Van Life: The Short Answer
The best composting toilet for van life depends on whether you value a compact footprint, frequent-use capacity, or a simple setup: choose the Air Head for a proven, self-contained design with substantial solid capacity; the Cinderella Travel if you want an incinerating toilet and can support its power and fuel requirements; or a urine-diverting DIY toilet if low cost and custom sizing matter more than an integrated, ready-made unit.
These options work differently. Air Head and DIY urine-diverting toilets separate liquid from solids; Cinderella Travel incinerates waste rather than composting it. That distinction affects installation, power, emptying, and operating costs. Product specifications can also vary by configuration, so confirm the dimensions and capacities for the exact version before building a cabinet around it.
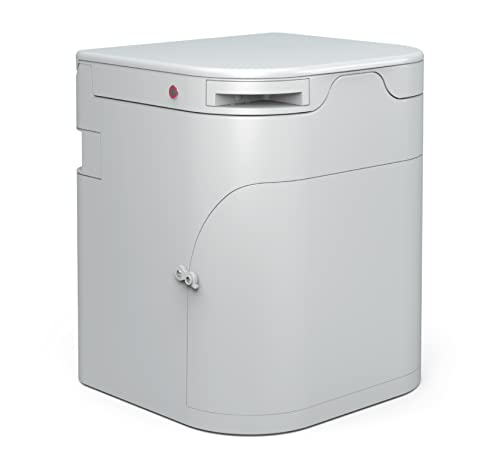
OGO Origin Compact Composting Toilet – 15in Footprint for Van, RV & Boat
Included for 'Best Composting Toilets for Van Life' because the listing specifies 15in Footprint for Van and RV & Boat, details this guide uses to compare options.
View on Amazon
Compo Closet Cuddy Composting Toilet – Odorless, Waterless & Self-Contained for RVs, Vans, Boats, Tiny Homes & Off-Grid | 3.9 Gal, 12V Fan, Carbon Filter, No Chemicals, Easy Clean
Included for 'Best Composting Toilets for Van Life' because the listing specifies Odorless and Waterless & Self-Contained for RVs, details this guide uses to compare options.
View on Amazon
OGO NOMAD Self-Contained Composting Toilet – Urine-Diverting, Portable RV
Included for 'Best Composting Toilets for Van Life' because the listing specifies Urine-Diverting and Portable RV, details this guide uses to compare options.
View on Amazon
TRELINO Composting Toilet Evo S Gray, Portable Toilet for Camping & Outdoor, Odorless, 1.2 gal & 1.6 gal Capacity, 13 x 15.4 x 11.7 inches
Included for 'Best Composting Toilets for Van Life' because the listing specifies Portable Toilet for Camping & Outdoor and Odorless, details this guide uses to compare options.
View on AmazonCompare the Options
| Option | Approx. footprint / height | Capacity | Ventilation and power | Best fit |
|---|---|---|---|---|
| Air Head composting toilet | About 19 × 19 in. at the base; seat height about 20 in. | Solid container about 5 gal; urine bottle about 2.2 gal | Vent hose and fan; fan typically draws around 0.1 A at 12 V | Buyers seeking a dedicated, self-contained urine-diverting unit |
| Cinderella Travel incinerating toilet | About 15 × 23 in. footprint; seat height about 18 in. | One liner per use; ash container holds residue from multiple cycles | Requires an exhaust installation and substantial 12 V power; fuel use varies by cycle | Travelers who want to avoid storing liquid waste and can support the system |
| DIY urine-diverting toilet (bucket or box build) | Often 12–16 in. wide; height is set by the enclosure | Common solids bucket: 3–5 gal; liquid bottle: commonly 1–2 gal | Vent fan is strongly recommended; power depends on the fan, often a small 12 V load | Budget builds, unusual layouts, and owners comfortable with routine upkeep |
Dimensions and capacities above are approximate planning figures, not guarantees for every model or build. “Capacity” does not translate directly to a fixed number of days: diet, temperature, user count, and how much cover material is added all affect the interval. Cinderella Travel is included as an alternative waste-management system, not as a composting toilet.
Which One Fits Your Van?
- Very limited floor space: Measure the complete operating envelope, not just the base. A lid needs room to open, and the user needs knee and elbow clearance. A custom DIY box can fit a narrow gap, but only if the liquid container can still be removed.
- Two people using the toilet daily: Prioritize liquid capacity and easy bottle access. A roughly 2-gallon bottle may need emptying daily or more often in warm weather. A larger bottle can reduce trips, but adds height and weight and must be secured for driving.
- Frequent off-grid stays: A fan-powered separating toilet uses little electricity compared with heating-based waste treatment. Check the fan’s actual draw and whether it can run continuously from your house battery.
- Minimal handling of liquid waste: An incinerating system avoids a urine bottle, but requires the specified fuel, power, exhaust installation, and time for cycles. It is not automatically simpler in a small van.
- Lowest upfront cost: A DIY urine-diverting build is usually the least expensive. Budget for a well-fitting diverter, sealed containers, a vent fan, hose, and a stable enclosure—not just a bucket and seat.
Capacity and Emptying: Plan for Your Actual Routine
For a urine-diverting toilet, the liquid container usually sets the emptying schedule before the solids container does. A useful planning estimate is to allow roughly 0.4–0.6 gallons of urine per adult per day, then adjust for use patterns. With two adults and a 2.2-gallon bottle, the theoretical interval is about 1.8–2.8 days; in practice, leave headroom and expect to empty sooner rather than filling it to the brim.
Solids last longer, but not indefinitely. A 5-gallon container may serve one person for several weeks under light use, while two people using it daily can fill it much sooner. The material needs enough dry cover to control moisture, and the container should be emptied before it becomes heavy or difficult to handle. Follow the manufacturer’s disposal instructions and local rules; “composting” in the product name does not mean fresh contents are ready for garden use.
Ventilation, Odor, and Installation
Odor control depends on separation, airflow, and correct use—not on fragrance. Keep the urine diverter clean, avoid letting liquid collect in the solids area, and use the recommended cover material. A blocked vent, loose hose connection, or fan running in the wrong direction can undermine an otherwise sound setup.
Before installation, mock up the toilet with cardboard and sit on it. Check seat height, door swing, access to the liquid bottle, and whether the solids container can be removed without dismantling cabinetry. Route the vent hose with as few tight bends as possible and terminate it where exhaust will not be drawn into a window or roof vent. Seal the penetration against weather and vibration. For a powered fan, use a properly fused circuit and follow the product’s wiring guidance; an always-on low-draw fan is often more effective than relying on occasional ventilation.
Incinerating toilets need a more involved exhaust route and a compatible power and fuel supply. Confirm the exact electrical requirements against your van’s system before purchase, especially if you rely on a modest battery or inverter. Do not assume that a vehicle’s standard outlet can support the required load.
Ownership Details That Matter
- What needs attention first: On separating toilets, the diverter and bottle opening need regular cleaning; seals, latches, and fan connections are common points to inspect. On a DIY build, the lid fit and container support matter as much as the seat.
- Consumables: Plan for cover material, cleaning supplies, and replacement seals or fan parts over time. Incinerating systems also require their specified liners and fuel.
- Common mistakes: Filling the urine bottle completely, using too much moisture in the solids container, skipping ventilation, or installing the unit where the waste container cannot be removed.
- Travel vibration: Secure bottles, buckets, and the toilet itself for driving. Recheck fasteners and hose joints after rough roads.
For most van owners who want a ready-made urine-diverting unit, the Air Head is the clearest starting point. Choose a DIY build when exact fit and low cost outweigh convenience. Choose Cinderella Travel only if its non-composting process suits your routine and you can accommodate its installation and energy demands. In every case, measure first and plan the emptying route before buying.







Write Your Review
No reviews yet. Be the first to share your experience!