
Key takeaways
- Installing by appearance alone: Similar-looking blades can use different rails, drive tabs, or mounting angles. Verify the exact model.
- Skipping the cleaning step: Hair under the blade can prevent a flat fit and cause vibration or overheating.
- Using the clipper immediately after oiling: Wipe off excess oil so it does not transfer to your dog’s coat or attract debris.
- Testing on a moving dog: Perform the first test on a small area while your dog is calm and properly supported.
- Ignoring heat: Check the blade every few minutes during grooming. Metal can become hot before the motor sounds abnormal.
- Forcing the latch or screws: A stubborn blade may be misaligned, damaged, or incompatible.
Replacing a dog clipper blade is a small repair that can make grooming safer, quieter, and more comfortable for your dog. A blade that is installed backward, left loose, or fitted with the wrong model can snag hair, pull skin, overheat, or fall off during a trim. Poor alignment can also create a gap where skin or fur gets caught. Before starting, confirm that the replacement blade matches your clipper’s brand and model—not just its appearance. This guide explains how to replace dog clipper blades safely in 2026, including removable blade systems commonly used on low-noise clippers.
What You Need
| Item | Why | Optional? |
|---|---|---|
| Compatible replacement blade | Provides a sharp, properly sized cutting surface. Check the clipper model and blade dimensions before buying. | No |
| Clipper or blade cleaning brush | Removes hair and grit from the drive area, blade teeth, and housing. | No |
| Clipper blade oil | Reduces friction, heat, and corrosion on the moving blade surfaces. | No |
| Soft, dry cloth | Wipes away loose hair and excess oil without scratching the clipper. | No |
| Small screwdriver | Needed only for models secured with screws rather than a snap-on blade. | Sometimes |
| Replacement blade guide or the clipper manual | Helps confirm the blade direction, latch location, and correct installation method. | Yes, but recommended |
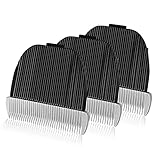
For oneisall low-noise clippers, replacement options may include a DODAER Replacement Blade Compatible with oneisall Low Noise Dog Clippers, listed at $25.99, or a two-pack replacement blade compatible with oneisall low-noise dog clippers, listed at $17.99. Prices and compatibility can change, so compare your exact clipper model, blade width, attachment style, and included accessories before ordering. A two-pack is useful if you groom regularly or want a spare, but it is not a substitute for checking fit.
As an Amazon Associate we earn from qualifying purchases at no extra cost to you. Product prices and availability are accurate as of the date shown and are subject to change.

Step-by-Step
-
Turn off, unplug, and cool the clipper (2 minutes)
Switch the clipper off and unplug it from the wall. If it is cordless, remove it from the charging stand and make sure the power button cannot be pressed accidentally. Let a recently used clipper cool for at least 10 minutes. A warm blade can burn your fingers and may hide a buildup of oil, hair, or residue.
Work on a stable, well-lit surface away from your dog. Place a towel underneath the clipper to keep small parts from rolling away. Never change a blade while the motor is running or while the clipper is connected to power.
-
Identify the blade-release mechanism (1–2 minutes)
Look at how the old blade is attached. Many pet clippers use a snap-on system with a release tab, hinge, or spring-loaded latch. Other models have a blade plate held by two screws. Some detachable blades slide forward or backward along a rail.
Do not force the blade from the housing. If you cannot see a release point, consult the instructions for your particular model. Prying against the plastic body can crack the housing or bend the blade support.
-
Remove the old blade (1–3 minutes)
Hold the clipper with the teeth pointing away from you. Press the release tab or lift the blade from the hinge according to the manufacturer’s design. Keep your fingers behind the cutting teeth, which can remain sharp even when the clipper is off.
For a screw-mounted blade, loosen the screws gradually and support the blade with your other hand. Put the screws in a small dish. Note the blade’s orientation before removing it: take a quick photo if necessary. The cutting teeth, hinge, and drive tab must face the same directions on the new blade.
-
Clean the clipper head and drive area (3–5 minutes)
Use a dry cleaning brush to remove hair from the clipper head, hinge, latch, and drive mechanism. Brush around the moving drive piece that powers the blade. Do not push hair deeper into the motor housing.
Wipe the housing with a dry or barely damp cloth, then allow it to dry completely. Do not rinse the clipper under a faucet unless the manufacturer specifically identifies it as waterproof. Water inside the motor can cause corrosion, electrical damage, or a safety hazard.
-
Inspect and prepare the replacement blade (2 minutes)
Compare the new blade with the old one. Check that the width, mounting points, guide rails, teeth, and drive tab match. Look for bent teeth, loose screws, sharp burrs, or a cracked plastic carrier. Do not install a blade that arrived damaged.
If the blade instructions call for lubrication before use, apply one or two drops of clipper oil to the cutting surfaces and hinge points. Use clipper oil rather than cooking oil, household spray lubricant, or motor oil. Too much oil attracts hair and can drip onto your dog’s coat.
-
Attach the new blade in the correct direction (2–4 minutes)
For a snap-on blade, place the rear hinge or mounting edge into position first. Lower the blade toward the clipper head until the latch clicks securely. For a slide-on system, align the rails and move the blade in the indicated direction until it stops. For a screw-mounted blade, position it using the original orientation, insert both screws, and tighten them evenly.
The blade should sit flat against the clipper head with no rocking, large gap, or visible misalignment. Do not overtighten screws; snug is sufficient unless the manufacturer specifies a torque setting. Overtightening can strip plastic threads or distort the blade plate.
-
Check the attachment by hand (1 minute)
With the clipper still off, gently wiggle the blade from side to side. It should not lift away from the housing or shift noticeably. Move the blade assembly through its normal travel if the design allows it. Confirm that the teeth are facing forward and that no latch remains partially open.
Keep your fingers away from the cutting edge while checking. If the blade does not sit flat or the release button stays depressed, remove it and repeat the alignment step rather than testing it on your dog.
-
Run a short test and monitor heat (2–3 minutes)
Turn the clipper on while holding it away from people and pets. Let it run for about 30 seconds. Listen for rattling, grinding, clicking, or an unusually strained motor. Turn it off immediately if the blade vibrates, slips, or makes contact with the housing.
After the test, touch the plastic body near the blade rather than the metal teeth. It may feel slightly warm, but it should not become uncomfortably hot within a few minutes. Apply a drop or two of blade oil if recommended, wipe away excess oil, and test again. A blade that heats rapidly may be dull, incorrectly fitted, clogged, or incompatible.
-
Make a cautious first pass (2–5 minutes)
Once the clipper passes the sound and fit check, test it on a small section of clean, dry fur. Use light pressure and keep the blade moving. Do not press harder to compensate for a blade that is tugging; stop and inspect the installation instead.
Check your dog’s skin frequently, especially around folds, armpits, ears, and the tail. Stop if your dog reacts suddenly, the clipper pulls hair, or the blade becomes hot. A replacement blade may need additional adjustment or may not be the correct part for your clipper.
Mistakes to Avoid
- Installing by appearance alone: Similar-looking blades can use different rails, drive tabs, or mounting angles. Verify the exact model.
- Skipping the cleaning step: Hair under the blade can prevent a flat fit and cause vibration or overheating.
- Using the clipper immediately after oiling: Wipe off excess oil so it does not transfer to your dog’s coat or attract debris.
- Testing on a moving dog: Perform the first test on a small area while your dog is calm and properly supported.
- Ignoring heat: Check the blade every few minutes during grooming. Metal can become hot before the motor sounds abnormal.
- Forcing the latch or screws: A stubborn blade may be misaligned, damaged, or incompatible.
How Often
There is no universal replacement interval because coat type, grooming frequency, blade quality, and cleaning habits all matter. A dog groomed weekly may need more frequent blade maintenance than a dog clipped every few months. Brush hair from the blade after every use, oil it according to the manufacturer’s directions, and inspect the teeth before each grooming session.
Replace or professionally sharpen a blade when it begins pulling hair, leaves uneven lines, requires repeated passes, or heats faster than usual. Always cool and oil the blade during longer grooming sessions; never continue using it after it becomes hot against your skin.
When to Call a Pro or Replace
Contact a professional groomer or clipper repair technician if the blade will not lock into place, the housing is cracked, the motor grinds, or the clipper smells like burning plastic. Professional help is also sensible when screws are stripped, the drive mechanism is bent, or the blade repeatedly loosens.
Replace the blade rather than trying to straighten badly bent teeth or repair a cracked carrier. If the clipper still pulls hair or overheats after a correctly installed replacement, the problem may be a worn drive lever, damaged motor, incorrect power supply, or internal buildup. Stop using it until the cause is identified.
FAQ
How do I know which dog clipper blade to buy?
Match the clipper’s exact brand and model, attachment style, blade width, and guide or drive mechanism. “Universal” in a product listing does not always mean compatible with every pet clipper. Compare the old blade with the replacement and check the manufacturer’s compatibility information before ordering.
Can I replace a dog clipper blade while it is warm?
Wait until the clipper and blade are cool to the touch. A warm blade can burn you, and heat may indicate friction or a mechanical problem that should be addressed before installing another blade.
Why is my new blade pulling my dog’s hair?
Confirm that the blade is facing the correct direction and sitting flat. Then clean the drive area, apply the recommended amount of clipper oil, and check that the blade is sharp and compatible. Matted, damp, or dirty fur can also cause pulling. Do not keep grooming if your dog shows discomfort.
Should I sharpen or replace a dull blade?
Replacement is usually the simplest option for home groomers, particularly when the blade has damaged teeth or a worn carrier. Professional sharpening may be worthwhile for premium blades, but use a qualified sharpening service because incorrect grinding can change the cutting angle and create unsafe gaps.


Write Your Review
No reviews yet. Be the first to share your experience!